Cordless drills are one of the most useful tools that a person can own. They offer the convenience of not having to worry about cords, and they are much more portable than their corded counterparts. However, one of the most common problems with cordless drills is that their batteries can die relatively quickly.
If you find yourself in this situation, don’t despair! There are a few things that you can do to jumpstart a cordless drill battery.
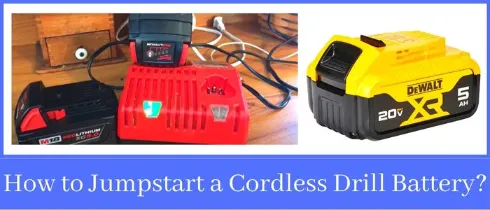
- Remove the battery from the cordless drill
- Connect the positive terminal of the battery to the positive terminal of a jumper cable
- Connect the negative terminal of the battery to the negative terminal of a jumper cable
- Connect the other end of the positive jumper cable to the positive terminal of a working car battery
- Connect the other end of the negative jumper cable to the negative terminal of a working car battery
How Do You Bring a Cordless Drill Battery Back to Life?
Cordless drills are one of the most versatile and useful tools that you can have in your home. They allow you to drill holes and drive screws with ease, and they’re relatively lightweight and portable so you can take them wherever you need to go. However, like all battery-operated devices, cordless drills can eventually lose their charge and need to be recharged.
If your drill’s battery is no longer holding a charge, there are a few things you can do to try to bring it back to life. First, if your drill has been sitting idle for awhile, try charging the battery overnight. This gives the battery a chance to fully recharge and might help revive it.
If this doesn’t work, try cleaning the terminals on both the battery and the charger with a cotton swab dipped in rubbing alcohol. This will remove any dirt or buildup that might be preventing the charger from properly connecting with the battery.
If neither of these methods work, your best bet is probably to replace the battery.
Drill batteries don’t last forever – even if they’re well-maintained – so it’s important to have a backup on hand just in case. You can usually find replacement batteries at your local hardware store or online.
How Do You Fix a Drill Battery That Won’t Hold a Charge?
If your drill battery won’t hold a charge, there are a few things you can do to try and fix the issue. First, make sure that the battery is properly charged. If it is not, then charge it for the recommended amount of time.
Next, check the connections between the battery and the drill.
Make sure that they are clean and tight. If they are not, then clean them or replace them as needed.
Finally, if all else fails, you may need to replace the battery itself.
How Do You Jump Start a 12 Volt Lithium Ion Battery?
Lithium ion batteries are becoming increasingly popular in a variety of applications, including 12 volt applications. There are several benefits to using a lithium ion battery over other types of batteries, such as lead acid batteries. One benefit is that lithium ion batteries can be charged and discharged much more rapidly than lead acid batteries.
This means that you can jump start a 12 volt lithium ion battery much more quickly and easily than you could with a lead acid battery. To jump start a 12 volt lithium ion battery, you will need to connect the positive terminal of the dead battery to the positive terminal of the good battery. Then, connect the negative terminal of the good battery to a metal ground on the vehicle.
Finally, start the drill with the good battery and let it run for a few minutes before starting the drill with the dead battery.
How to Charge 18V Lithium Battery Without Charger
18V lithium batteries are one of the most popular types of batteries on the market today. They are used in a wide variety of applications, including power tools, RC toys, and more. Many people choose to use these batteries because they offer a longer lifespan than other types of batteries.
One thing that many people don’t know about 18V lithium batteries is that you can actually charge them without using a charger. This can be done by using a simple 9V battery. All you need to do is connect the positive terminal of the 9V battery to the positive terminal of the 18V battery, and then connect the negative terminal of the 9V battery to the negative terminal of the 18V battery.
Charging your 18V lithium battery without a charger is a great way to save money and time. It’s also a great way to make sure that your battery is always ready to go when you need it.
How to Fix a Lithium Ion Battery That Won’t Charge
If your lithium ion battery won’t charge, it’s likely because the charging port is damaged or the battery itself is damaged. If the charging port is damaged, you’ll need to replace it. If the battery is damaged, you may be able to revive it by following these steps:
1. Clean the battery terminals with a cotton swab dipped in vinegar.
2. Use a multimeter to test the battery voltage. If it’s below 3 volts, it’s probably dead and you’ll need to replace it.
3. Charge the battery with a low-voltage charger for 12 hours. Then test the voltage again. If it’s above 3 volts, try using the device again.
Drill Battery Charger Hack
If you own a cordless drill, chances are you’ve also got a battery charger. And if you’re like most people, that charger is probably sitting in a drawer somewhere, only getting pulled out when your drill needs a boost. But what if I told you that there’s more to your battery charger than meets the eye?
With a few simple hacks, you can turn your boring old charger into a powerful tool for charging your batteries faster and extending their lifespan.
First things first: let’s talk about how battery chargers work. Most modern chargers use something called pulsed charging, which delivers short bursts of power to the battery as it charges. This helps to reduce heat build-up and improve overall efficiency.
Charging times will vary depending on the type of battery being charged and the capacity of the charger, but generally speaking, it should take around 1-2 hours to fully charge a standard 12V lead-acid battery.
Now that we know how they work, let’s get down to business and learn how to hack them!
The first hack is pretty simple: if you need to charge your batteries in a hurry, just switch from the “trickle” setting to the “fast” setting on your charger. This will increase the amount of power flowing into your batteries, allowing them to reach full capacity faster. Just be sure not watch closely while they’re charging – those sparks can be pretty dangerous!
The next hack is designed for long-term storage: if you’re going to be keeping your batteries stored for an extended period of time (more than 3 months), it’s important to keep them topped off so they don’t sulfate. To do this, simply set your charger to its lowest “trickle” setting and hook it up overnight once every month or two. This will keep your batteries fresh and ready to go when you need them most.
And that’s all there is too it! With these simple hacks, you can get more out of your drill battery charger than you ever thought possible.
Cordless Power Tool Battery Hack
Cordless power tool batteries are expensive, and it can be frustrating when they die prematurely. However, there is a simple hack that can extend the life of your battery significantly. All you need is a piece of aluminum foil and a rubber band.
Wrap the foil around the battery terminal (the positive end) and secure it with the rubber band. This will prevent the battery from losing its charge as quickly. You may notice that your power tool runs slightly less efficiently with the foil in place, but this is a small price to pay for a longer-lasting battery.
And, once your battery does finally give out, you can recycle it and use the aluminum foil trick on a new one!