If your drill bit becomes damaged or dull, you’ll need to replace it. Luckily, this is a relatively easy process. You’ll just need to purchase the correct size replacement drill bit and follow these simple steps.
- If you need to change a drill bit on a hand-held drill, make sure that the drill is unplugged.
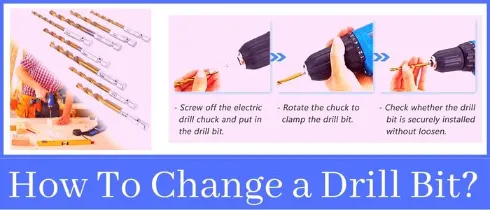
- At first remove the chuck key from the drill
- Next, loosen the chuck by turning it counterclockwise
- Then, insert the new drill bit into the chuck and tighten it by turning it clockwise
- Finally, replace the chuck key and you’re ready to go!
How Do You Loosen a Drill Chuck?
A drill chuck is a type of clamp used to hold bits in place on a drill. Over time, the jaws of the chuck can become tightened from use, making it difficult to remove or insert bits.
If you’re having trouble loosening a drill chuck, there are a few methods you can try.
One way to loosen a stuck drill chuck is by using an impact driver. An impact driver is a tool that delivers quick, powerful blows that can loosen stubborn screws and bolts.
To use one, simply fit the tip of the driver onto the head of the screw or bolt and strike it with a hammer until it loosens. You may need to do this several times before the chuck becomes loose enough to turn by hand.
Another method for loosening a drill chuck is to use locking pliers. Locking pliers have serrated jaws that grip tight when pressure is applied, making them ideal for loosening stubborn screws and bolts.
To use them, simply fit the jaws of the pliers around the head of the screw or bolt and apply pressure until it begins to turn. Once it’s loose enough, you should be able to unscrew it by hand.
If neither of these methods work, you may need to resort to using heat. Heat will expand metal, which can sometimes break through rust or other buildup that’s causing the Chuck To seize up.
To apply heat, use an electric torch or heating gun and aim it at the base of The Chuck where it meets the drill body for about 30 seconds . Be careful not to overheat The metal as this could damage the drill .
Once heated, try unscrewing The chuck again .
How to Remove a Drill Bit (Keyed & Keyless Drill Chuck)
Are you looking for a way to remove a drill bit? There are a few different ways that you can do this, and the method that you use will depend on the type of drill bit that you have.
Here are a few tips on how to remove a drill bit:
If you have a standard twist drill bit, the first thing that you need to do is loosen the chuck. To do this, unscrew the chuck clockwise until it is loose enough to allow the bit to be removed. Once the chuck is loosened, simply pull the drill bit out of the chuck.
If you have a spiral fluted drill bit, start by loosening the setscrews that hold the bit in place. Once these setscrews are loosened, unscrew the chuck counterclockwise until it is loose enough to allow the bit to be removed.
Spiral fluted bits often have a left-handed thread on them, so be sure to turn the chuck counterclockwise in order to loosen it.
After the chuck is loosened, pull out the drill bit.
Some drills have a keyless chuck that does not require any setscrews or other fasteners in order to secure the drill bit. If your drill has this type of chuck, simply grasp the end of the shank with your fingers and pull outward on the shank until the entire bit comes out of the chuck .
How to Change Drill Bit Black And Decker Without Key
Are you looking for a way to change your Black and Decker drill bit without a key? If so, then you’ve come to the right place! In this blog post, we’ll show you how to do just that.
First, start by removing the battery pack from your drill. Next, locate the chuck release button on the side of the drill (it’s usually red). Once you’ve found it, press and hold the chuck release button while simultaneously turning the chuck clockwise.
This will loosen the jaws of the chuck and allow you to remove the old drill bit. Now it’s time to insert the new drill bit. First, make sure that it is properly seated in the jaws of the chuck.
Next, turn the chuck counter-clockwise until it is tight. Finally, reattach the battery pack and you’re ready to go!